m (More pics :)) Tag: rte-source |
m (Reword "raid" to "Base Raid" for better clarity) Tag: rte-source |
||
| Line 347: | Line 347: | ||
===Orders Matter=== |
===Orders Matter=== |
||
| − | If you've read the [[LBAS]] page you'll probably notice that the enemy |
+ | If you've read the [[LBAS]] page you'll probably notice that the enemy Raid can damage your planes in base plus loss of resources. The number of planes lost during Base Raid depends on damage taken and it happens from the 1st slot down. |
Personally I've never seen plane lost beyond the 2nd slot, so the damage happens to slot #1 most of the time. For this reason I always consider the order of planes in a base. |
Personally I've never seen plane lost beyond the 2nd slot, so the damage happens to slot #1 most of the time. For this reason I always consider the order of planes in a base. |
||
Revision as of 02:25, 20 August 2017
HiHi!
I will try to share some tips regarding LBAS operation this time. As usual, this article was written with newer TTK in mind, so the maths have been kept to a minimum.
Intro
Very often during events, I notice some TTK using LBAS setup that is obviously copy-pasted from somewhere without giving thoughts to the situation on hand. It's not surprisingly to hear complaints like "my LBAS did NOTHING!" or "I'm bleeding bauxite like crazy halp!"
Although this is still a game of RNG, a TTK should ask if he/she has given their fairies the best chance to succeed or just trying to get a lucky shot and be done with it.
In this article I will share some of my experience with LBAS management and hopefully make your (and your fairy's) life easier in the next hunt :)

Terminology
To avoid confusion, during the course of this article the following terms will be used unless specified otherwise:
- Each plane slot in the base will be referred to as "slot" or "squadron"
- Each landbase (4 slots) will be a "base"
- Each LBAS pass will be a "pass" or "wave" or "strike"
- "Sending a base" meaning concentrating both waves to the same node
The Basics
First I'm going to assume that you are familiar with the concept of Aerial Combat, ie how much Fighter Power (FP) is required for AP/AS/AS+ and what it means in terms of plane shotdown etc. Don't worry if you're not, have a quick read and try to understand the Aerial Combat Stages and the Fighter Combat table.
LBAS pretty much follows the same rule of Aerial Combat, with a few notable exceptions. For example:
- Fighter Power is calculated differently (to accomodate Sortie vs Defense Mode)
- Planes in the land base have morale just like kanmusu
- LBAS operation is limited by a range
- It costs Fuel/Ammo to sortie in addition to refueling
- Recon planes give bonus modifier for Base Defense
- When concentrating both waves to the same node, only the losses from the 2nd wave is counted
The first 3 items should be straight forward, just open the relevant pages when you need to look something up. I have also included a few FP tables towards the end of this article for quick references.
Now onto the often overlooked...

LBAS Sortie Cost
A lot of TTK overlook the LBAS sortie cost (or just didn't know that it existed!) and only see how much they must pay to refuel the planes. I recently met a TTK who was sending LBAS while farming E4-Q of Spring 2017 and he was shocked to learn that LBAS costs rsc up-front! Can't really blame him since the cost is already deducted when returning to base and there's no animation indicators =.=
Here's a table of simplified cost associated with fully-supplied LBAS Sortie and a few common scenarios. The actual formula is listed in the LBAS page for those interested.
| LBAS Sortie Cost | ||
|---|---|---|
| Land Based Bombers | 27 | 12 |
| Regular Planes | 18 | 11 |
| Regular Scout Planes (eg Saiun) | 4 | 3 |
| Taitei/Catalina | 12 | 4 |
| LBAS Sortie Cost | Comments | ||
|---|---|---|---|
| 3 Fighters + 1 LBA Bomber | 81 | 45 | |
| 2 Fighters + 2 LBA Bombers | 90 | 46 | |
| 1 Fighter + 3 LBA Bombers | 99 | 47 | |
| 4 LBA Bombers | 108 | 48 | Re-training cost |
| Taitei + 1 Fighter + 2 LBA Bombers | 84 | 39 | Long Range Bombing Escort |
| Taitei + 2 Fighters + 1 LBA Bomber | 75 | 38 | Long Range Bombing Escort |
Now you know where those missing fuel/ammo's gone :)
Note that there is no up-front cost for Base Defense, so don't let your base take a pounding!


Base Defense with Recon
While it is true that recons give a base defense modifier (R) based on its LOS, it's important to note that not all recons are the equal:
- A 9+ LOS water plane (eg max★ zero obs) gives 16% bonus
- A 9+ LOS carrier recon (eg Saiun) gives 30% bonus
So use Saiun for base defense whenever possible.
Next thing to consider is that since Saiun takes up 1 slot (1 less fighter in base), it is not always better to put it in. The question is, when?
When to use a Saiun:
- When you have less than 4 interceptors
- Using 3 planes of very different performance
When NOT to use a Saiun:
- When you have 4 of the same/very similar planes and cannot afford interceptors
Assuming a TTK's got 4 Reppuu, each slot is capable of X fighter power:
- 4 Reppuu gives 4X fighter power.
- 3 Reppuu + 1 Saiun gives 3X*1.3 = 3.9X fighter power
ie the Saiun actually hurts in this case. In most other cases you'd want a Saiun though.


This is of course a generalisation using simple maths. You're encouraged to play around with one of the available air power calculators to work out a scenario that suits you best:
- http://kancollecalc.web.fc2.com/air_supremacy.html
- http://aircalc.net/
- If you can't read Japanese, try setting up the Event/World 6 LBAS and read from your viewer.
Concentrating LBAS Attacks
This is another mechanic often overlooked by newer TTKs. Each air base has 2 attack passes and when both passes are focused on the same node, only losses from the 2nd pass is counted.
You may doubt the mechanics because of stories like "but I lost proficiencies despite losing only 1-2 planes?!" While the story may be true, it's a separate head-scratching matter.


Without digging too deep, this is one way to make it easier to remember: when concentrating a base on a single node, the enemies can only shoot paintball at your 1st pass (while you shoot real bullets at them kek). No matter how many hits you take in the 1st pass, no planes are lost; however if you take too many hits, you'll be labeled as noob anyway (loss of proficiency) :P
Why is it programmed like this? Hey don't ask me, go poke Tanaka xD
This is however a very important mechanic that every TTK should take advantage of. It will be explained in more details later.
LBAS Setup
In this section I will go over a few things to consider when setting up your land base. As always, I will explain the consideration that went into a choice. Try to understand why a decision is made rather than simply copying it, so that you can adapt them to your own need.
General Rules (TL;DR)
My personal preferences goes something along these lines:
- Have the highest fighter power (FP) in the 1st base.
- Have the highest bombing power (BP) in the last base.
- If recon/fighter/bombers all present in the same base, the slot order from top to bottom will be Recon-Fighter-Bomber.
- Aim for AP in most situation.
These will be explained in details later. But before we go any further, let's have a look at how LBAS operates.
How LBAS Operates
I remember seeing a post during Spring 2017: a TTK sent 3 LBAS to the boss node but got slaughtered. He was wondering why the combined fighter power (FP) of all 3 bases, enough to achieve AS+ at the boss node, only got AI/AD in the end.
Well there may be a lot to improve in his case but the most obvious problem here is the keyword: combined. That is not how LBAS operates in Sortie mode... (would've been close if it was Base Defense mode kek)
When LBAS engages the enemy, each pass is equivalent to a fleet lauching 4 squadrons of planes. The usual Aerial Combat takes place and the FP/AA at the beginning of each pass determines fighter/bomber losses for each side. If a base concentrates both waves on the same node, same thing happens except there is no loss for your 1st pass (while the enemy suffers full damage).
In this example, the 1st, 2nd & 3rd base will be called LBAS1, LBAS2 & LBAS3 respectively.
Consider the following setup:
| Effective Fighter Power (eFP) | |
|---|---|
| LBAS1 | 180 |
| LBAS2 | 170 |
| LBAS3 | 160 |
| Enemy Fleet | 300 |
All 3 LBAS were sent to concentrate on the same node. While aircraft shot down is subject to RNG, we will take arbitary value within the bound of theoretical limitations for the ease of presentation.
| LBAS1 eFP | Enemy eFP | |
|---|---|---|
| LBAS1 (1st pass) - Starting eFP | 180 | 300 |
| Air Control Status | AD | |
| eFP Loss (due to Shot Down) | -25 | -30 |
| Remaining eFP | 155 | 270 |
| LBAS1 (2nd pass) - Starting eFP | 180 | 270 |
| Air Control Status | AP | |
| eFP Loss (due to Shot Down) | -20 | -45 |
| Remaining eFP | 160 | 225 |
| LBAS2 (1st pass) - Starting eFP | 170 | 225 |
| Air Control Status | AP | |
| eFP Loss (due to Shot Down) | -20 | -35 |
| Remaining eFP | 150 | 190 |
| LBAS2 (2nd pass) - Starting eFP | 170 | 190 |
| Air Control Status | AP | |
| eFP Loss (due to Shot Down) | -20 | -30 |
| Remaining eFP | 150 | 160 |
| LBAS3 (1st pass) - Starting eFP | 160 | 160 |
| Air Control Status | AP | |
| eFP Loss (due to Shot Down) | -20 | -25 |
| Remaining eFP | 140 | 135 |
| LBAS3 (2nd pass) - Starting eFP | 160 | 135 |
| Air Control Status | AP | |
| eFP Loss (due to Shot Down) | -20 | -20 |
| Remaining eFP | 140 | 115 |
Note now the 2nd wave starts at full eFP (no loss registered).
It is clear that each base must be planned individually so that the desired FP can be achieved at the target node, rather than following some generic advice like "2 fighters + 2 bombers" and leave your fairy's fate to the RNG alone.
With that out of the way, let's look at the rationale behind each recommendations.
Highest Fighter Power in the 1st Base
When sortieing multiple bases, the 1st Base attacks first, followed by the 2nd, then the 3rd Base. Combined with the fact that the 1st pass of a concentrated attack takes no physical damage, it makes sense to maximise the FP in the 1st base and to reduce enemy FP as much as possible.
A weakened enemy fleet translates to less FP for the subsequent bases, ie more bombers for them.
If things were setup the other way round (ie more FP for Base#3 and all bombers in Base#1) then you can imagine your bombers take heavy pounding from not only enemy AA, but also enemy fighters; fairies parachuting everywhere and set adrift in little gum boats... *shrugs*
Don't be a kuso TTK complaining about your LBAS did nothing at all in this case; they're order for a suicide mission =.=
Highest Bombing Power in the Last Base
Following the same train of thought, since the 1st base will take the worst pounding from the enemies, it makes sense to save the best bombers for the last base.
If things go according to the plan, enemy FP would've been heavily reduced by the time the last base engages (less fighter requried); also, a few enemy ships may have been sunk in previous waves, ie less AA against your bombers!
A base full of the best bombers with minimum escort can totally wreck havoc on weakened enemies, as opposed to going up against a swarm of fighters.
I think there's no need to iterate what happens if the order is switched, right? =.=
Orders Matter
If you've read the LBAS page you'll probably notice that the enemy Raid can damage your planes in base plus loss of resources. The number of planes lost during Base Raid depends on damage taken and it happens from the 1st slot down.
Personally I've never seen plane lost beyond the 2nd slot, so the damage happens to slot #1 most of the time. For this reason I always consider the order of planes in a base.
"If recon/fighter/bombers all present in the same base, the slot order from top to bottom will be Recon-Fighter-Bomber."
There is no doubt that if a Recon is in base, it should be used to tank the air raid damage before anything else. I have yet to come across a raid that wipes all my recons but even if it happens, no one knows if that prevents the range extension effect or not. Imo it's safe to assume that it'll never happen till proven by photo report.
Things get a bit more complicated when only Fighter+Bombers are in base. Imo there's no right or wrong answer, just what one tries to achieve and whether the setup can help reaching that goal. Let's have a look...
In most situation, I think about doing damage to the enemy fleet, ie sinking ships. If the objective is to sink ships, then it's probably more important to preserve the bombers and let the fighters tank the damage.
In very rare situation, say if the objective is to wipe out enemy Fighters and my base is slightly short of FP, I might move the cheapest bomber to the top to tank for the fighter. I'll only do this if 4 fighters is overkill while 3 fighter is a bit too short. (Actually this may change now that Hayabusa Fighter-Bomber is in game. Fighter-bombers don't benefit that much from proficiency gain so they're perfect tankers in this case)
Aim For AP
Ah yes, the million dollar question: "so how much FP is enough?" Once again the answer depends on the objectives.
Before I do any calculations (using one of the calculators linked above) I like to first think about how my fleet will perform without the help of LBAS:
- Can my fleet achieve AS/+?
- Are there any enemies weak against certain attack?
- Are there enemy tanker likely to absorb the said attack? (coughDysoncough)
- Can my fleet finish the full health boss 6v1 in yasen? If yes, how many more enemies can I take on?
- Which enemy is likely to taiha my ships (and prevent them from contributing in yasen)?
- Is the boss extra vulnerable to bombing?
Considering a list like that gives me an idea of how to use my LBAS:
- Fighter sweep so my fleet can carry more bombers? (FP focused)
- Garbage disposal to give better chance in yasen? (Bombing focused)
- VIP snipe? CV Hime and Dyson are known to be weak to bombing from time to time. Taking them out during the day greatly increases yasen success. (Well some bosses are weak against bombing and it's always pleasant to see the gauge explode before formation is declared kek)
It's not hard to imagine what to prioritise for extreme cases (ie bomber/fighter spam), so let's stick with a "need to do everything" scenario for a moment; scenario like this requires more thought and planning.
I then look at my LBAS and see how many fighters are needed per base to maintain AP (and hopefully easy AS/+ for the fleet aerial combat phase). Maintaining AP means 0-60% enemy plane shot down per pass and less allied plane loss in the end. It is certainly an attractive setup for the 1st Base.
Note that the shot down is RNG based so there will be good rolls and bad rolls. Our goal is to have good result most of the time while minimising bad experiences. (You can always do a few test runs and look at the LBAS record for a feel)
If too many fighters are required in LBAS I may go back to adjust my fleet for more carrier-based bombers, use LBAS for pre-boss nodes or even consider suicide missions in rare cases (and bear the proficiency loss, rip fairies ;w;)
Here it is perhaps easier to visualise using a real example.


Case Study
Let's look at a recent example, say Spring 2017 E5H Boss Node.

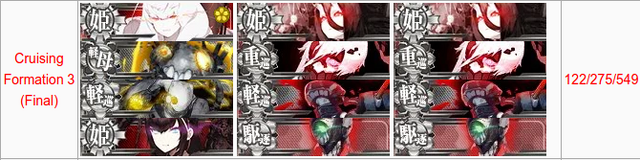
122/275/549 FP for LD, if one goes with STF then there's no doubt that the fighter mules in the fleet aren't gonna do significant damage; the LBAS will need to wipe out as many enemies as possible while it isn't so important to reduce enemy FP. BBs will have to output enough damage during the day while the escort practice dodge-balls till yasen.
...or at least that was the plan. Those troll subs at B-node made me switch to CTF for LD and all of a sudden things got interesting: I can use 4 carriers! Let's nuke the crap out of the boss and leave the FP control to the LBAS :D
As usual, I start by visiting the calculator and fill my 1st base with fighters for AP. Bit less FP for my 2nd base, and best bombers in my 3rd base and here's what I got:


Air Power calculation for each LBAS. The bar with kanji reads (left-to-right) AI-AD-AP-AS-AS+ respectively
Seems very likely to achieve AP with 2 fighters + 2 bombers in Base#1 and 1 fighter + 3 bombers in the other 2 bases. Note that the FP for Base #2 & #3 are slightly below AP threshold, but bear in mind that the enemy FP would've been chipped down by 2 waves of Base#1 attack, ie less FP requirement for AP.
I also tried dropping 1 fighter for Base#1 but the FP was way to low to gaurantee AP, therefore I went with this setup. I then proceed to fill the bases accordingly and load up my carriers with lots of bombers.


Note how Base#1 has the highest FP, while the last Base has the best bomber setup; also for each base, fighters are leading the way (tanking for air raid losses) as we discussed earlier. All 3 bases aiming for AP.
Also note that the fleep FP is only ~400. This is taking into consideration that the 3 lbas would sufficiently reduce enemy fleet FP for AS+ at boss node.
Time to take it for a test run and make adjustment if necessary...


Granted there's a lot of RNG involved for this 1-try-LD, planning ahead maximised the chance for it to happen. Had I gone with bombers-first-fighters-last things would've been very different for sure =.=


Savings From Not Swapping Often
The use of LBAS is restricted at the beginning of Events nowadays. The air bases are unlocked one by one as the player progress through the event, while the last map usually presents all 3 bases at the player's disposal.
This leads to one commonly seen problem: the bases may be filled from #1 to #3 according to the need of previous maps, instead of the present!
Since most people know that it costs resources to put planes into an air base, a lot of TTK leave the already-filled bases untouched and follow a cookie-cutter recipe of "X fighters + Y bombers" to fill in the newly acquired bases.
This practice is of course hardly ideal, because the player will have little control over the order and power balance across the bases. I suspect that when armed with good understanding of how LBAS works, most TTK will not send their best bombers to tank in the 1st wave while having the best fighters eating bento in the 3rd; at least I hope you will not make that choice having read this far!
While it is very difficult to achieve desired order/setup without re-shuffling a single plane, the aim of this section is to help you do it as efficiently as possible.
The Idea
When it comes to saving resources, you want the layout of each base to look as closely to what you need on the last map as possible. The less often you swap the planes, the less "transaction fee" you must pay.
In order to do that, ideally you should wait till information for all maps are available then plan out the LBAS using calculators. This is not always possible (and by no means compulsory) should you choose to front line or by other factors (eg Time Pressure).
I'll re-list what I consider ideal practice when it comes to LBAS setup:
- Have the highest fighter power (FP) in the 1st base.
- Have the highest bombing power (BP) in the last base.
- If recon/fighter/bombers all present in the same base, the slot order from top to bottom will be Recon-Fighter-Bomber.
- Aim for AP in most situation.
Once again this is just a guide. It's important to constantly assess the situation and adapt as you see fit.
With a little tweak of interpretation, the said list can become a resource saving guide when new bases are acquired:
- Leave as many fighters in the 1st base if possible (don't pull them out unless needed elsewhere).
- When bombers are needed, add them to the 3rd (or 2nd) base if possible.
The other 2 bullet points should be trivial and easily manageable during any stage of the event. Just remember that when planes are re-ordered within the base (by dragging), it will be marked as "occupied" and unavailable for transfer till cool down wears off (12-min nominal).
Add/remove planes if needed, but try to stick to the tips above as humanly as possible. Let's look at a few examples:
Example 1
Say on E2 (1 base allowed) you have 3-Fighters 1-Bomber in Base #1.
On E3 (2 bases allowed) you noticed that the enemy FP is weak and you can afford 2-Fighter 2-Bombers in Base #1 and 1-Fighter 3-Bombers in Base #2.
This should be a no brainer: remove 1 fighter and put 2 bombers into Base #1. Fill Base #2 as desired.
Note that even if you could get away with 1-Fighter 3-Bombers in both bases (but run the risk of AD if unlucky), I would recommend leaving 2-Fighters in Base #1 not only for insurance (but also to save cost later).
Whatever you choose in this scenario does not have a big impact, since only 1 plane slot is at stake. Now let's spice things up a bit.
Example 2
Once again on E2 (1 base allowed) you have 3-Fighters 1-Bomber in Base #1.
However on E3 (1 base Sortie + 1 base Defend) you can only sortie 1 base. Now what do you do?
I would recommend checking the LBAS restriction for the last map of the Event: if all 3 bases are allowed to Sortie, then I would swap out the Base #1 Bomber for a recon/interceptor, drag the recon/interceptor to slot #1 and set the base on defense. Fill Base #2 as desired.
However, if the last map is a 2+1 (2 base Sortie + 1 base for Defense), I will fill the 2nd base with recon + interceptors while trying to keep as many fighters in Base #1 as possible.
Example 3
Let's take the previous example one step further. Consider this LBAS requirement:
- E2: 1 Base Sortie
- E3: 1 Base Sortie + 1 Base Defense
- E4: 2 Base Sortie
- Last Map: 3 Base Sortie
Oh dear... I'd cringe if I see this list. Say for E2 the same arrangements were deployed (3-Fighters 1-Bomber), how would you setup up the LBAS for E3-E5?
Think about this one for a bit, then compare with my response.
E3: I would pull out the bomber and put a recon/interceptor into Base #1 and it for Defense. Fill Base #2 as desired.
E4: Replace Base #1 recon with a Bomber. Check how likely to achieve AS. Can Base #2 get away with less fighters? If not, try to maintain 2-Fighters in Base #2. (2-Fighters 2-Bombers are the most flexible compo when it comes to map change. Only need to change 1 plane to achieve desired effect in most cases)
Last Map: Fill Base #3 as desired and adjust the other 2 to suit.
How did you do? Is your response similar to mine? There is no right or wrong answer, it's more important to plan things based on what's needed and what you got on hand.
The point of the whole exercise is to get you thinking and to raise awareness that the base can be planned ahead and maybe save a penny here and there.
Some of you might have noticed this scenario in the previous example. If so, kudos to you! :)
If you're keen, try working out what to do if E5 (in a 7 map event) is a 2+1 (oh the cringe =.=)


Resources
Quick Reference Tables
Comparison of notable aircrafts are presented below with various sorting and LBAS mode of operation (Sortie vs Base Defense). Kanji names have also been included to help non-moonrune readers who wants to utilise airpower calculators.
Make sure that the correct table is used (Sortie vs Base Defense) as the FP performance of aircrafts may vary.
Disclaimer: These data are presented out of good will and may be subject to errors, use at your own risk!
Abbreviations:
- FP: Fighter Power
- eAA (Sortie): Equivalent AA value in Sortie Mode. [eAA (Sortie) = Displayed AA value + 1.5*Intercept value + Improvements].
- eAA (Defense): Equivalent AA value in Base Defense Mode. [eAA (Defense) = Displayed AA value + Intercept value + 2*Anti-Bomber value + Improvements].
- eFP: Effective Fighter Power, assuming max-slot (18 planes) and max-proficiency. In the case of Base Defense mode, bonus from recon planes were not included.
| List of Short Range Fighters/Interceptors Sorted by FP (Sortie Mode) | ||||
|---|---|---|---|---|
| Plane | Kanji Name | Combat Radius | eAA | eFP |
| Shinden Kai | 震電改 | 2 | 15 | 89 |
| Type 3 Fighter Hien | 三式戦 飛燕 | 3 | 12.5 | 78 |
| Raiden | 雷電 | 2 | 3 | 2 |
| List of Notable Bombers/FB Sorted by FP (Sortie Mode) | ||||
|---|---|---|---|---|
| Plane | Kanji Name | Combat Radius | eAA | eFP |
| Zero Fighter Model 62 (Fighter-bomber / Iwai Squadron)★max | 零戦62型(爆戦/岩井隊)★max | 5 | 9.5 | 40 |
| F4U-1D | F4U-1D | 6 | 7 | 29 |
| Bomb-carrying Type 1 Fighter Hayabusa Model III Kai (55th Squadron) | 爆装一式戦 隼III型改(55戦隊) | 5 | 6 | 25 |
| Type 1 Land-based Attack Aircraft Model 34 | 一式陸攻 三四型 | 8 | 4 | 16 |
| Type 1 Land-based Attack Aircraft Model 22A | 一式陸攻 二二型甲 | 10 | 3 | 12 |
| Type 1 Land-based Attack Aircraft | 一式陸攻 | 9 | 2 | 8 |
Adapted from: wikiwiki (Special thanks to @WashBoard17)
Air Power Calculators


Remarks
I hope this article helps you get the thinking process going. A mission planned by yourself is far more flexible than a cookie-cutter build copied from somewhere else, which in turn should make your life easier.
Take care of your fairies and they'll bring you victories you desire. Don't throw them in danger needlessly pls...

.png)